Phased Array Inspection
Addressing Stainless Steel and Dissimilar Metal Weld Inspection with Advanced Phased Array Ultrasonic Techniques.
Published on 28th June 2023

Image credit @eddyfi
Phased array ultrasonic testing is a mature and widely adopted technology that allows for the inspection of critical components in various industries. Over the last five years, new techniques like full matrix capture and live total focusing method have been available on most high-end phased array ultrasonic testing units. They have been introduced in ASME codes and ISO standards with dedicated training courses, as prescribed by the codes, offered by large training centers.
However, innovation is ongoing, and non-destructive testing equipment vendors are constantly working to make the inspection process as seamless as possible. There is always a desire to make inspections easier to set up, and faster to perform, and inspection data imaging quality improved for best-informed decisions—especially when it comes to the unique factors presented with stainless steel and dissimilar metal weld inspection.
The Challenge
Overcome the challenges associated with inspecting complex materials like dissimilar metal welds including low resolution of flaw images and inadequate coverage.
The industry recognizes that it is increasingly challenging to inspect complex materials like dissimilar metal welds which typically consist of at least two different materials, mostly involving Inconel alloys, often used to connect clad carbon steel vessels to stainless steel piping. Misoriented or branched cracks can easily be missed and undersized. In fact, for some inspection configurations and damage mechanisms, standard phased array probes and wedge combinations will not provide the required inspection capability to achieve the desired results. Therefore, Eddyfi Technologies presents a better solution employing advanced focusing techniques such as a total-focusing method to help improve detection.
The Solution
Advancements in phased array ultrasonic testing methods play a key role in the success of inspecting austenitic materials and complex welds.

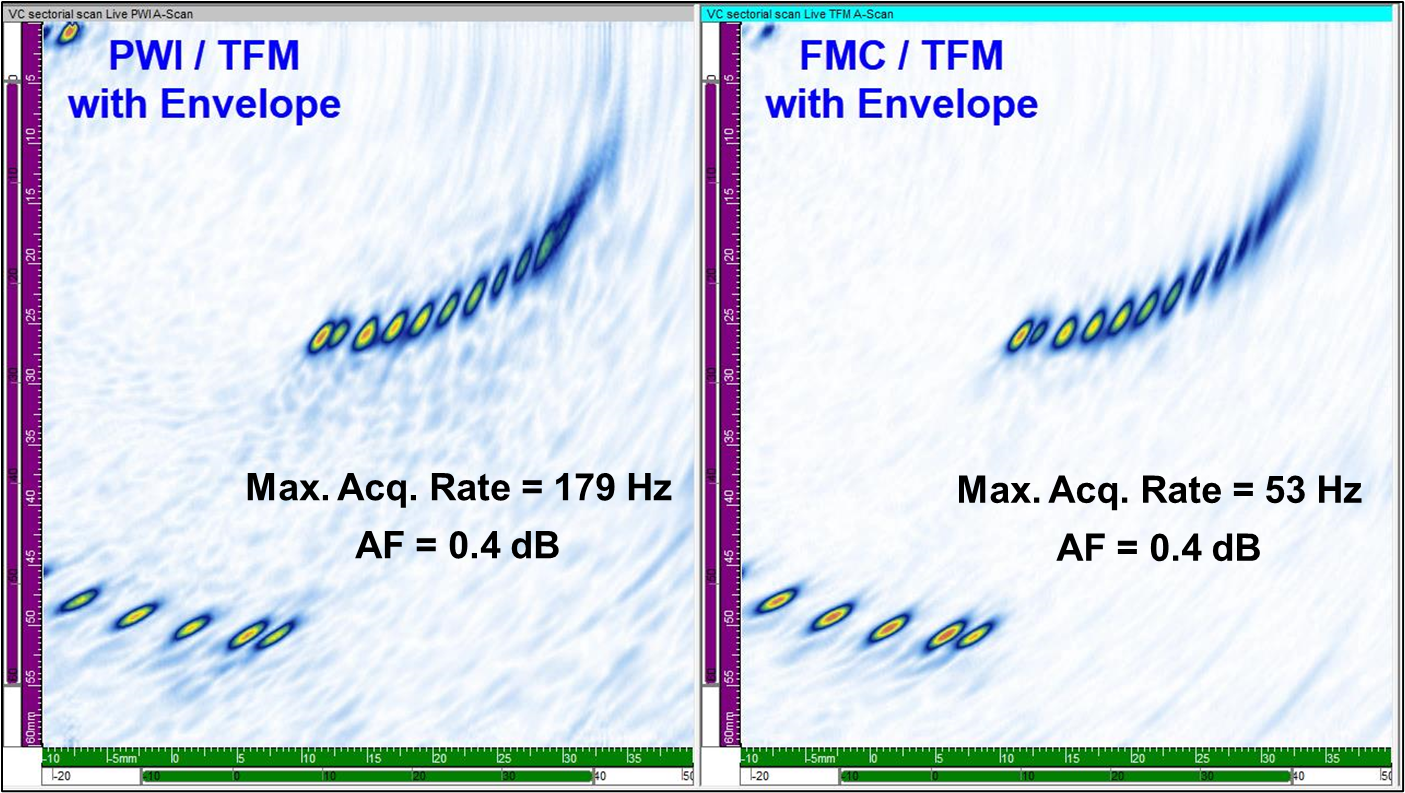
Figure 1: ASTM E2491 reference block pulse-echo L-waves on carbon steel component. Left: Plane Wave Imaging/Total Focusing Method with envelope Right: Full Matrix Capture/Total Focusing Method with envelope.

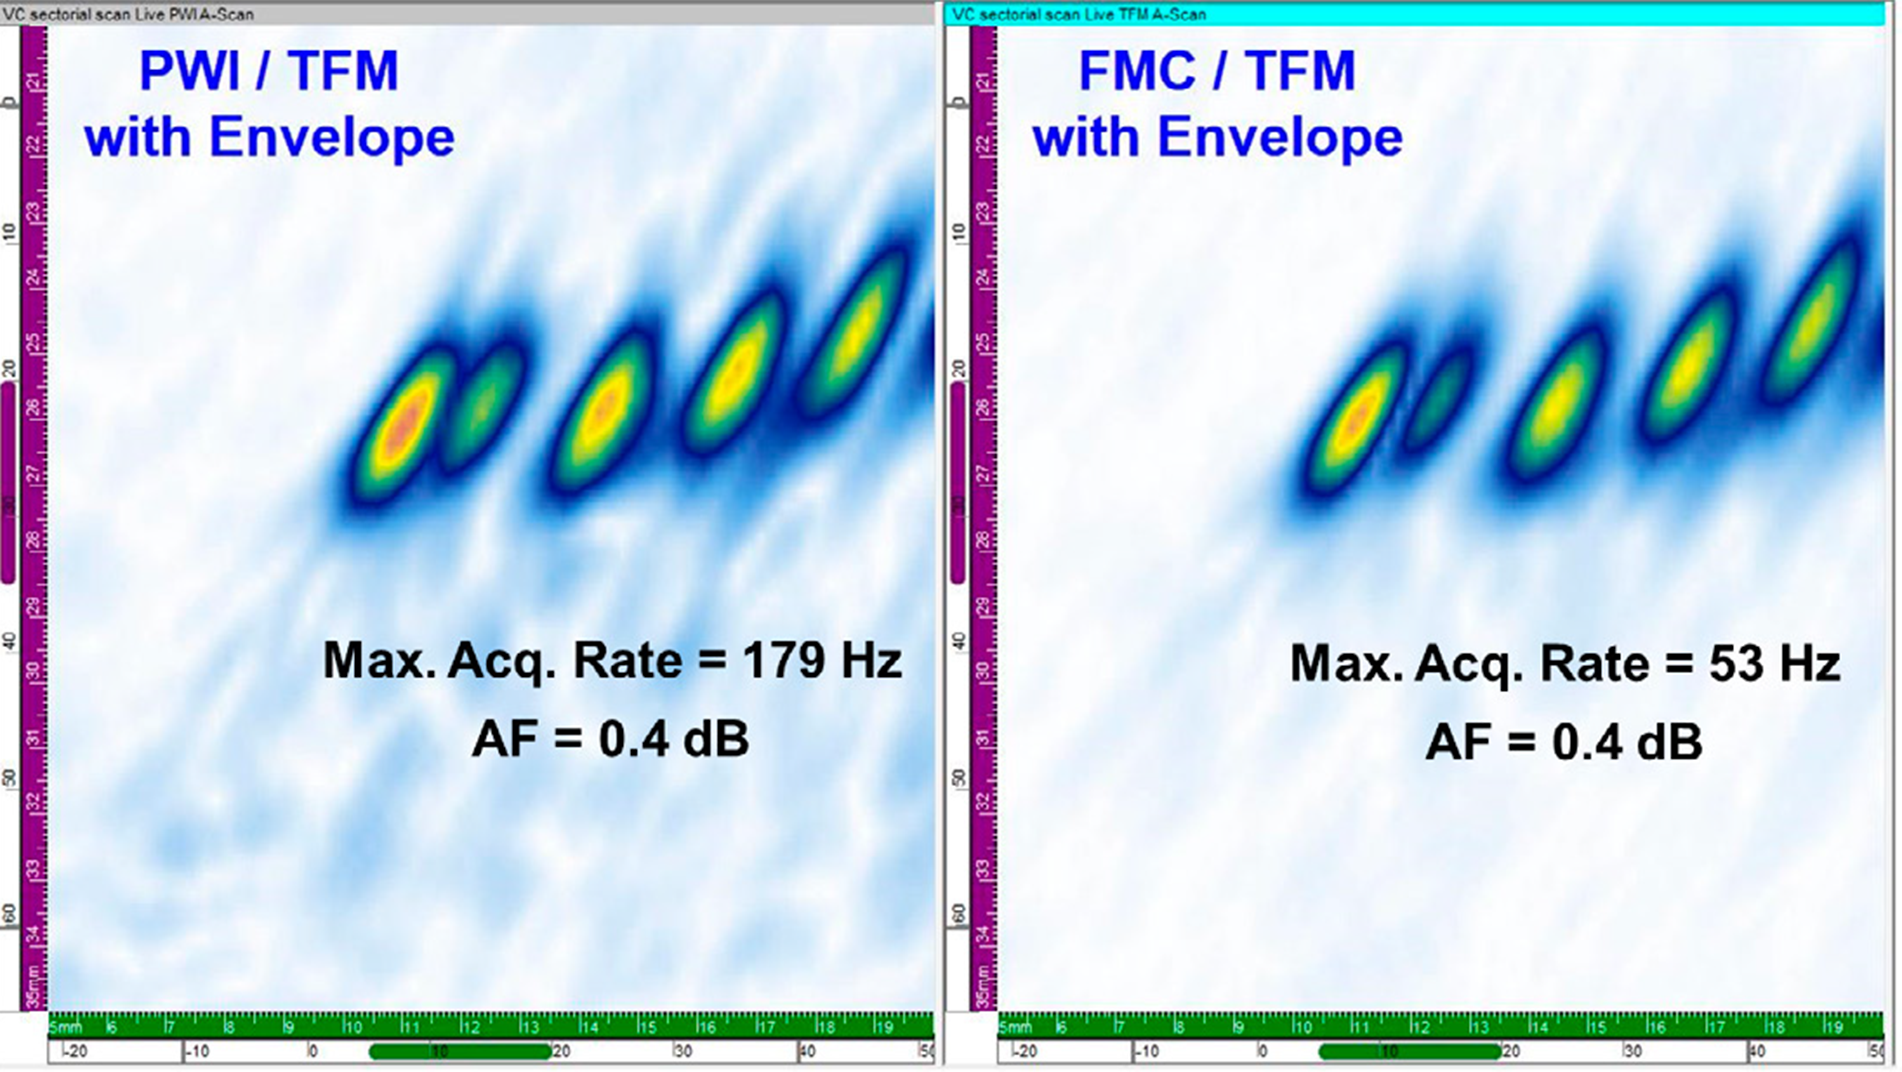
Figure 2: Zoomed-in image with clear defect morphology
The most common advanced focusing algorithm, the total focusing method, sums the elementary A-scan signals from all elements in the array to generate a frame of pixels where each pixel is computed using a dedicated focused focal law. The frames can be used for “live” interpretation, or they can be stored for each position of the probe, very similar to a “dynamic” merge view in a regular phased array. The process results in nearly ideal focusing on each point of the near-field zone of the active aperture, and this improved image resolution allows for better characterization and sizing of challenging flaws found in stainless steel and dissimilar metal welds.
A recently introduced feature, the total focusing method envelope obtains the image from the magnitude of the summed analytic signals through a Hilbert transform. The resulting live total focusing method images look like phased array signals with a smoothing filter applied. This delivers the same amplitude fidelity as the regular reconstruction while using a larger pixel size. This means that a lower resolution can be used, increasing the scanning speed without any loss in inspection quality.
Full matrix capture is a firing technique that consists of capturing and recording A-scan signals from every transmitter-receiver pair in an array. From the raw A-scan signals, it is then possible to generate ultrasonic testing imaging with advanced focusing techniques like the total focusing method, either live or through post-processing.
Plane-wave imaging is an alternative firing technique that uses a multi-element aperture for pulsing instead of firing each element individually like full matrix capture. Receiving is done individually with each element. The firing sequence typically consists of multiple focal laws, with varying angles and/or apertures. Just like full matrix capture, total focus method imaging can be done live during the inspection.
Plane-wave imaging data acquisition has several benefits when compared to full matrix method data recording. The emitted pulse from the full aperture has more energy and is more directional than a single-element excitation. It provides greater sensitivity and better signal-to-noise ratio together with a higher pulsar firing rate and scanning speed because of a significantly shorter firing sequence and fewer elementary signals to process. At the same time, less elementary A-scans recorded means a significantly smaller data file for raw data saving.
When zoomed in on the two 1-millimeter (0.39-inch) diameter side-drilled holes that are only slightly more than a millimeter apart, you can see in Figure 2 that they are clearly resolved in both cases. The maximum acquisition rate for the plane wave imaging firing sequence is more than 3x higher which allows a 3x faster inspection.
Eddyfi Technologies Emerald is a compact phased array ultrasonic testing instrument that includes all the advanced methods discussed, delivers fast performance and intelligent results, and features exceptional signal quality meaning it can achieve high amplification without signal distortion. With real-time multi-total focusing method processing onboard and offline, combined with its full matrix capture and plane wave imaging data acquisition features, the Emerald phased array system can produce faster and more detailed inspection results than most instruments on the market. Given its advanced capabilities, it is the ideal solution for addressing stainless steel and dissimilar metal weld inspections.
The Benefits
Improved detection, increased inspection coverage, flaw characterization, speed, and data quality for better-informed decisions.
These advanced focusing techniques allow for the inspection of more complex configurations in a variety of industrial environments. Plane-wave imaging specifically not only offers improved resolution and inspection coverage but also drastically increases the inspection speed allowing inspectors to save time and increase productivity—all while maintaining the same high-resolution images expected from the total focusing method. This makes phased array ultrasonics an important technique in any inspector’s toolkit. Contact our experts to discuss your project featuring unique challenges and unlock a world of advanced non-destructive testing possibilities.


