Near-Field Array
How NFA Brings Speed and High PoD to Low Density Polyethylene Reactor Tubes.
Published on 6th July 2023

Image credit @eddyfi
Low-Density Polyethylene (LDPE) plastic is created when ethylene is polymerized. To generate this transformation, ethylene must be mixed with a catalyst under pressure and at high temperatures. Historically, autoclaves have been used to reach this environment. However, autoclaves are mostly outdated equipment as they are limited in production capacity and expensive to run. To meet the global demand for this highly-used plastic resin, plastic producers have switched to tubular reactors. LDPE tubular reactors are made of multiple processes and equipment, one of these being ferromagnetic alloy tubes manufactured with a thick wall, above 10 millimeters (0.4 inches), to withstand the high pressure and temperature required. To maintain process efficiency as well as to guarantee employees’ safety, these tubes must be inspected regularly in a timely manner, without any compromise on the Probability of Detection (PoD) of defects.
The Challenge
LDPE tubular reactors are made of thick ferromagnetic alloy tubes and a thin film deposit remains during the inspection. Moreover, the process requires high pressure, therefore, any small defects must be detected.
Made of thick ferromagnetic alloy, LDPE reactor tubes are designed to withstand 52,000 psi (3,600 bar) and their internal diameter is commonly between 70 and 90 millimeters (2.8 and 3.5 inches). Moreover, when the reactor is stopped to perform the inspection, a thin deposit layer forms on the internal surface of the tubes. From an inspection point of view, this characteristic is important to consider as the sensors of a probe cannot be in contact and/or at a constant distance from the metal surface. As for the flaws, small fatigue cracks must be detected on their inner surface given the high pressure involved in the process.
These characteristics make standard tube inspection methods inapplicable. For ferromagnetic alloy tubing, Remote-Field Testing(RFT) is commonly used. However, the reactor tube thickness is too much for an RFT probe to give a signal response. Another common option would be to rely on IRIS. In this case, the deposited layer prevents the ultrasonic signal from reaching the inner wall. As for Near Filed Testing (NFT), a single-element probe, the defects of interest sit below the minimal detection threshold for this technology.
In the past, eddy current rotative probes were used. These probes include a rotating head on which a sensing coil is placed. When an inspection is performed, the probe is slowly pulled as the sensor rotates. This forms a helicoidal scan. While this technique provides high resolution to detect targeted defects, it also has some important drawbacks:
- Inspection speed is very slow since it depends on the maximum rotation speed of the probe head.
- Moving parts are fragile and susceptible to rapid wear.
The use of such a probe can be tricky. The rotation of the sensor must not be obstructed by what is present in the tube and the probe must remain well centered.
The Solution
A large, custom Near-Field Array (NFA) probe with a dedicated mechanical design deployed in conjunction with industry-leading Ectane® 2 instrument and Magnifi® software.

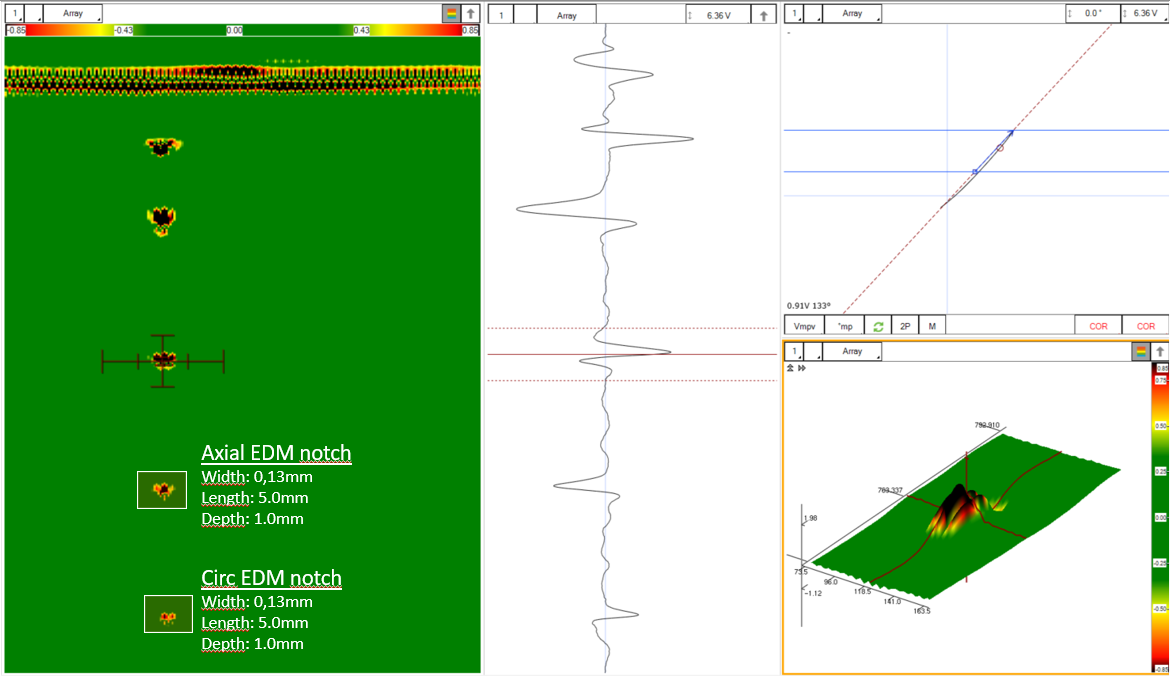
Figure 1: Calibration Tube Scan

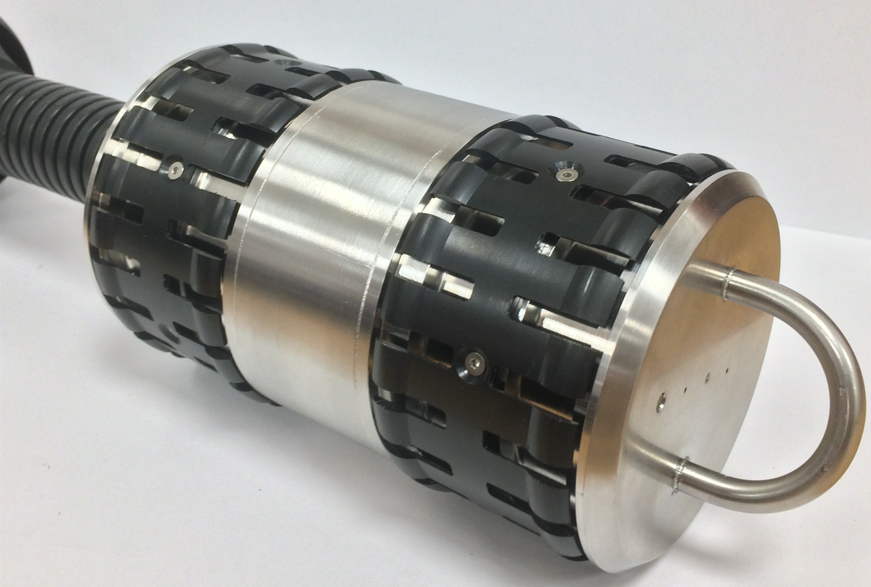
Figure 2: Probe Head

Figure 3: Side View of the Probe
To meet this challenge, Eddyfi Technologies developed a custom near-field array probe with a specific mechanical design.
Unlike other technologies, the near-field focuses on internal defects and is unaffected by external features such as aluminum fins typical on air coolers. Similarly, the probe designed for the reactor is not affected by the high tube thickness and the coil pattern offers high sensitivity to detect the targeted defects.
Near-field array probes consist of a bobbin transmitter wound around the circumference of the probe and an array of receiver pancake coils next to it. In addition to offering 2D and 3D imaging of the inside for better data analysis, this pattern offers great detection of very small defects. As you can see in Figure 1, two small notches of only 0.13 millimeters (0.005 inches) wide are clearly detected.
On the mechanical design, using an array of coils eliminates the need for moving parts that tend to be more fragile. Moreover, it makes the acquisition speed faster since it does not depend on the maximum rotation speed of the probe head used on a rotating probe. Using industry-leading electronic acquisition equipment, Ectane 2, the receiver coils are read simultaneously. In this case, the NFA acquisition speed was estimated to be at least four times faster than the rotative probe. Thus, for each 51-meter (167-foot) section inspected, a gain of more than 18 minutes was achieved on the acquisition time alone. Typically a reactor has 30+ tubes, meaning the NFA can save more than a day on the complete inspection.
On the mechanical side, a set of petal-shaped centering devices were incorporated into the probe design. This feature served two purposes: to keep the probe close to the center of the tube to have a consistent response around the circumference and to limit rapid wobbling and the associated undesirable probe response.
To further improve the centering of the probe, a centering ball with a flexible section connected to the probe head was integrated (Figure 3). Its purpose was to prevent the rigid cable probe sheath from applying a decentering force on the probe head where the sensors were located.
The exterior of the probe head was mainly made of metal parts that made it robust and wear resistant. In this respect, the plastic centering devices were designed to be interchangeable in case of wear.
Finally, the probe included a tether line attached to the end of the probe head. Thus, in the unlikely case of breakage, the parts could be extracted from the tube easily. A metal half-ring was also installed on the probe head nose for easier manipulation.
The Benefits
Delivering the client’s expectations on the minimal detectable defect with more efficient acquisition.
With this design, Eddyfi Technologies’ probe was able to meet the client’s goals: detect small defects and efficiently perform the analysis to reduce production downtime. This was achieved with a robust design that kept the probe centered and stable in the tube, the array of coils providing the high resolution and sensitivity needed to detect very small defects. To complete the offer, the highly versatile Ectane 2 acquisition instrument was used to acquire the data, and the analysis was performed on the industry-leading Magnifi software to give the asset owner all the information to make the best assessment of the reactor tubes.


