Table of Content
- Liquid Penetrant Testing
- Acceptance Criteria For Liquid Penetrant Testing
- List of Industry Standards for Liquid Penetrant Testing
- Liquid Penetrant Testing Acceptance Criteria
- Common Challenges in Meeting Acceptance Criteria
- Key Takeaways
- FAQs
The early 1940s, like through the times, had simple NDT techniques used to detect flaws in various products. The surface was coated in thin paint, and vibration was induced in the subject, which caused the delicate film created on the surface to crack at points of discontinuity. This uncomplicated yet effective technique has been one of the predecessors of the now prevalent this method. LPT is a commonly used non-destructive testing technique that aids in detecting deformities on the surface of materials. The main subject for such tests is non-porous materials that might have the potential for discontinuities on their surface texture, which may be unacceptable for their intended use.
Liquid Penetrant Testing
Liquid Penetrant Testing uses a dye applied on the test material's surface. This dye enters defect points and cracks and is either visible to the naked eye or fluorescent (which requires special lighting for flaw detection). The penetrant may be sprayed on the surface or brushed, or the workpiece may even be dipped into the penetrant. The penetrant is then allowed to dwell for a pre-determined time, and the excess penetrant on the surface is removed. Capillary action causes the penetrant to travel deep into the defects. A developer is then applied to the surface to bring the penetrant that has seeped into said defects to the surface to create a visual depiction of the deformities' location, shape, and dimensions.
This visible dye is then observed under white light, specific frequencies, or ultraviolet light and evaluated as per acceptance criteria set by scientific institutions for the particular material and its application. This technique is preferred because it produces an amplified visible detection of the defect and provides a high-contrast visual that facilitates uncomplicated flaw detection.
The Liquid Penetrant Test method provides the location of a variety of surface disparities, some of which are:
- Cracks caused due to Quenching of metal after Heat Treatment
- Defects formed during machining processes like milling, grinding, etc.
- Defects caused due to bending stresses, tensile stresses, etc., may cause fatigue.
- Fractures are caused due to improper or excess application of load.
- Voids and defects in weld zones
- Lap formations in metal
Read More, Liquid Penetrant Testing: A Complete Guide
Acceptance Criteria For Liquid Penetrant Testing
NDT methods have rigorous industry standards to ensure that the data obtained from them can be thoroughly quantified and assessed and that the potential for errors and misjudgments is eliminated. These standards are varied across materials, dimensions, structures, and every industry. Professional associations like the American Society of Mechanical Engineers, American National Standards Institute, American Welding Society, American Society of Testing and Materials, and the American Petroleum Institute have set meticulous standards for the Procedure for Liquid Penetrant Testing.
These criteria formulated by the scientific institutions for the LPT test create a classification of the variety of potential defects and the nature and magnitude of deformities that would be approved during inspections. These standards classify various elements of the test process to create a generalization to maintain uniformity in measurement. Penetrants are a primary element of this testing process, as they are the leading indicators and locators of flaws. Penetrant materials are primarily classified into two varieties, which are:
- Fluorescent Penetrants
- Visible Penetrants
The Liquid Penetrant Testing process also involves the removal of the excess penetrant solution to highlight the penetrant material trapped in the deformities on the surface. This excess penetrant can be removed from the surface with multiple methods, which often rely on the nature of the penetrant itself. As per standards, these materials are classified as follows:
- Water washable
- Emulsifiable, Lipophilic
- Emulsifiable, Hydrophilic
- Solvent removable
A further classification is drawn based on the accuracy of the penetrant in being trapped into defect zones and ranges from an ultra-sensitive penetrant to an extremely low-sensitivity penetrant. There are up to five levels in this classification. The penetrants, in certain scenarios, require a developer to draw the penetrant solution to the surface of the test subject to improve visibility and the detection probability of minute cracks and deformities in the material. The Aerospace Material Specifications – 2644 Inspection Material, Penetrant, and Military Specification- Inspection materials, Penetrants (MIL-I-25135) classify this based on the material characteristics of the developer, which are:
- Dry Powder
- Water Soluble
- Insoluble, water suspended.
- Non-Aqueous, Fluorescent
- Non-aqueous, Visible Dye
- Special Applications
The variety of penetrants available behave differently in certain applications and take time to penetrate defects thoroughly. To eliminate errors caused due to premature inspection in such scenarios, a factor called dwell time is characterized based on the vacillating applications of penetrants, which categorizes dwell time based on the following factors:
- Penetrant surface tension
- Contact angle.
- Shear viscosity of the penetrant under dynamic capillary effect. This value can vary from the standard viscous property of the penetrant material due to the size of the capillary it enters (defect zone)
- Atmospheric pressure
- The pressure of gases entrapped in defects.
- Crack radius and Crack Depth Measurement
- Penetrant density
- Interfacial properties of the penetrant
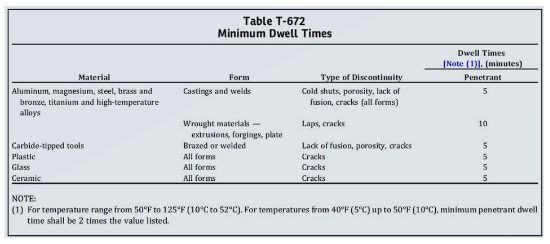
The dwell time values for common materials and classifications in penetrant testing are categorized according to industry standards such as the American Society of Mechanical Engineers, BPVC, Section-5. T-672, Article 6, as follows:
A generalized idea of the dwell time of commonly used materials, to their applications are as follows:
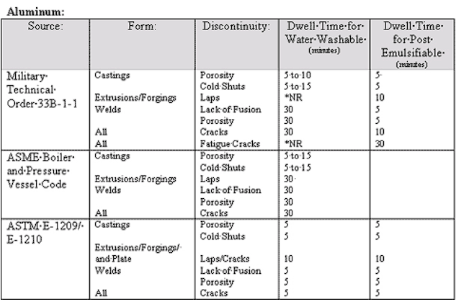
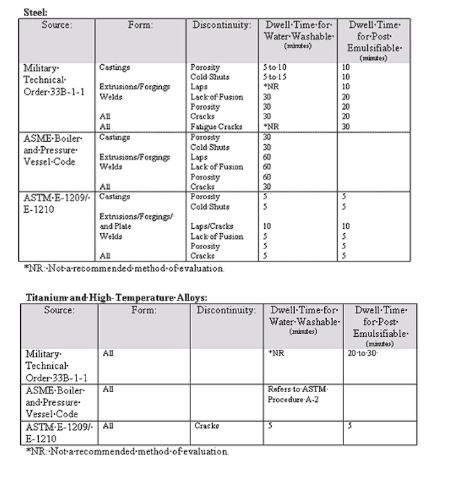
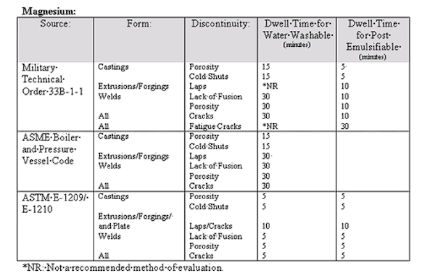
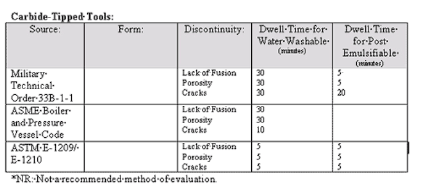
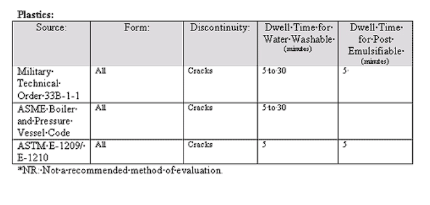
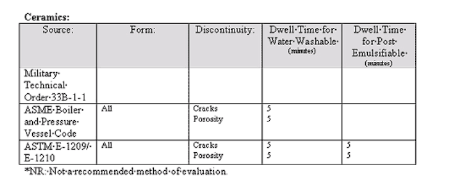
This meticulous nature of the characterization of individual elements of the process of Liquid Penetrant Examination shows the versatility, popularity, and accessibility of this Non-destructive Testing process.
The brightness of the penetrant is also categorized under the standards set by the American Society of Testing and Materials E-1135, wherein the brightness levels of fluorescent penetrants are compared and quantified.
The penetrant removal post the Penetrant Testing process is an important step that needs to be carried out with caution, as the handling and disposal of the chemicals involved, as well as the residual effect of the chemicals on the test subject need to be thoroughly evaluated to ensure unobstructed continued operation of the test subject.
Read More, Acceptance Criteria for Liquid Penetrant Testing
List of Industry Standards for Liquid Penetrant Testing
A list of industry standards followed while carrying out Liquid Penetrant Testing are as follows:
American Petroleum Institute 1104
American Welding Society D1.1
American Society of Mechanical Engineers, Section VIII Division 1
American Society of Mechanical Engineers, B31.1
American Society of Mechanical Engineers, B31.3
American Society of Mechanical Engineers, Section V
American Society of Testing and Materials, E-165
International Organization of Standardization (ISO), 3452-1
International Organization of Standardization (ISO),3452-2
International Organization of Standardization (ISO),3452-3
International Organization of Standardization (ISO),3452-4
International Organization of Standardization (ISO),3452-5
International Organization of Standardization (ISO),3452-6
International Organization of Standardization (ISO),3059
International Organization of Standardization (ISO),12706
International Organization of Standardization (ISO),23277
European Standards, EN 10228-2
European Standards, EN10246-11
European Standards, EN 1371-1
European Standards, EN 1371-2
Liquid Penetrant Testing Acceptance Criteria
Appendix 8 of the American Society of Mechanical Engineers, Div. 1, Section VIII sets the standard for Liquid Penetrant Testing with the following guidelines:
- Surfaces should be free from relevant linear indications.
- Round indications with dimensions greater than 4.8mm should not be on the surface.
- A line of four or more relevant indications should not be on the surface, separated by 1.6mm of space.
In this DPT acceptance criteria, the term relevant indications refers to defects highlighted by the penetrant testing method requiring further analysis. This analysis stands as the basis for the acceptance or rejection of the test subject.
1. Linear indications
It refers to indications whose length exceeds their width by three times. The dye penetrant test acceptance criteria (ASME) for the study of linear indications are as follows:
In the case of linear indications, indications of size greater than 1.59mm are relevant indications, which can be rejected in the case of:
- The indications are in the form of crater cracks or star cracks with lengths greater than 3.96mm
- The indications are not in the form of crater cracks or star cracks.
- In cases of weld zones, the indications are considered as an incomplete fusion with a length greater than 25.4mm in a continuous weld measuring approximately 304.8mm
2. Rounded indications
These are detected that are elliptical or round with a length lesser than thrice the width. The LPT acceptance criteria (ASME) for the inspection of rounded indications are as follows:
In the case of rounded indications, its largest dimension is measured as its size, with relevant indications greater than 5mm. As per dye penetrant testing standards, these indications can be rejected if:
- The size of the individual indication is greater than 3.17mm
- The standards set by the American Petroleum Institute, 1104 fig. 18 regarding the concentration of scattered rounded indications are not met.
- Rounded indications that are clustered exceed 12.7mm
- The combined length of clustered indications exceeds 12.7mm in a 304.8mm weld.
- Individual indications present in a cluster exceed 1.59mm
The standard for Liquid Penetrant test Acceptance for Process Piping is measured in American Society of Mechanical Engineers B31.1, Clause 344.4.2. The criteria provided herein are the same as ASME Section VII Div. 8. The LPT acceptance criteria as per the American National Standards Institute (ANSI), American Society of Mechanical Engineers B31.1 and B31.3 are as follows:
3. Relevant indications
Relevant indications are considered as those with dimensions greater than 1.5mm
- Cracks and linear indications of all kinds are considered.
- Rounded indications with dimensions greater than 5mm and four or more in number, separated by 1.5mm, are considered.
- Indications are more than ten on a test surface of dimensions 152.4mm, with major dimensions of the area not exceeding 152.4mm.
The Liquid Penetrant Testing acceptance criteria for casting (used for pressure vessels and rotating equipment) is covered under the American Society of Mechanical Engineers, Section VIII, Div. 1, Appendix 7. Hot tears and cracks are automatically rejected within this code, irrespective of their size.
4. Rounded indications
In the case of rounded indications, dimensions greater than 5 mm are subject to rejection.
- In the case of linear indications with a thickness greater than 19.05mm, indications greater than 6.35mm are rejected. For indications between 19.05mm to 57.15mm, the maximum permissible linear indication can be of a size equal to 1/3 the thickness value.
- The indications of acceptability depend on the different codes and standards. While certain codes and standards might accept indications of certain dimensions and forms, others may reject them.
As per the DPT test criteria set by the American Welding Society D1.1, the criteria include an inspection by a project engineer. The service condition gauged by the project engineer will determine the criteria for acceptance or rejection. The criteria, according to the standards, will be as follows:
The company Det Norske Veritas and Germanischer Lloyd have set codes for Sub-marine pipeline systems, DNV F101, which set the following criteria for acceptance:
- Crack-like indications, in this environment, are rejected.
In the case of rounded indications:
- Diameters lesser than 3mm are rejected.
- Clustered rounded indications in an area of 100mmx150mm should be less than 8mm
In the case of linear indications:
- Indications with lengths exceeding three times the width are rejected.
- Indications lesser than 1.5mm are considered irrelevant.
Common Challenges in Meeting Acceptance Criteria
Any industry or process that requires human aid has a potential for error. To eliminate these probabilities, there is a strict set of criteria that regulate inspection processes. Meeting them, however, can be a major challenge, due to a variety of reasons. Some of the common challenges involved in meeting these criteria include:
Surface Preparation:
One of the key challenges in meeting DPT acceptance criteria is ensuring proper surface preparation before conducting LPT. Inadequate cleaning can lead to false indications or mask defects, impacting the accuracy of results.
To overcome this challenge, it is essential to employ thorough cleaning techniques such as solvent degreasing or abrasive blasting. Additionally, ensuring surfaces are properly dried helps prevent false readings.
Contamination Control:
Contamination during LPT poses a significant challenge that can affect the accuracy of results. Contaminants like oils, paints, or residual penetrants can interfere with the testing process, leading to misleading outcomes.
Implementing stringent cleanliness protocols in testing environments and using clean testing materials are essential solutions. Regular equipment maintenance and calibration also play a crucial role in controlling contamination and ensuring accurate results.
Interpretation of Results:
Interpreting test results accurately is another challenge faced in meeting liquid penetrant testing acceptance criteria, particularly when dealing with subtle indications or ambiguous findings.
Trained personnel with expertise in flaw detection and interpretation are vital to overcoming this challenge. Investing in comprehensive training programs for technicians and providing reference materials for consistent interpretation of results are recommended solutions.
Environmental Factors:
Environmental conditions such as temperature, humidity, and lighting can significantly impact the effectiveness of LPT. Variations in these factors can affect the visibility of indications and overall test accuracy.
Controlling environmental conditions within specified ranges and using supplementary lighting or UV lamps for enhanced visibility are effective solutions. Whenever possible, conducting tests in controlled environments further mitigates the impact of environmental factors on testing outcomes.
Documentation and Reporting:
Accurate documentation and reporting of test results are essential to meet regulatory requirements and industry standards. Maintaining detailed records of testing procedures, results, and any deviations from acceptance criteria is crucial. Implementing robust documentation systems, utilizing digital reporting tools for efficiency and accuracy, and conducting regular audits to ensure compliance are recommended solutions.
Addressing challenges such as surface preparation, contamination control, result interpretation, environmental factors, and documentation is essential for meeting LPT acceptance criteria. By implementing the suggested solutions, practitioners can enhance the accuracy and reliability of their testing processes, ensuring compliance with industry standards and regulatory requirements.
Key Takeaways
- Adherence to industry standards, such as those set by professional associations like the American Society of Mechanical Engineers (ASME), ensures uniformity and reliability in acceptance criteria.
- These standards classify defects, specify penetrant materials and removal methods, and establish criteria for defect size and shape, providing a framework for accurate testing and evaluation.
- Challenges in meeting LPT acceptance criteria include surface preparation, contamination control, result interpretation, environmental factors, and documentation.
- Solutions such as thorough cleaning techniques, stringent cleanliness protocols, comprehensive training programs, controlled environmental conditions, and robust documentation systems can help overcome these challenges.
FAQs
1. What are some common defects found by a liquid penetrant test?
A: Common defects found by a liquid penetrant test include cracks caused by quenching of metal after heat treatment, defects formed during machining processes, defects caused by bending or tensile stresses, fractures due to improper load application, voids, defects in weld zones, and lap formations in metal.
2. What are the industry standards for liquid penetrant testing?
A: Industry standards for liquid penetrant testing are set by professional associations such as the American Society of Mechanical Engineers (ASME), American National Standards Institute (ANSI), American Welding Society (AWS), American Society of Testing and Materials (ASTM), American Petroleum Institute (API), and others. These standards provide guidelines for the procedure, classification of defects, and acceptance criteria for different materials and applications.
References
1. IRC Engineering Services
2. World of NDT
3. Lowa State University

