Non-destructive testing for concrete
Non-destructive testing is the process of detecting the quality without destructing the material or without changing its actual properties.
A Rebound Hammer is also called a Schmidt hammer or Swiss Hammer or Concrete hammer test.
This NDT method is used to detect the strength of Concrete Slab or rock, by identifying the hardness or elastic property.
Principle of Rebound Hammer Test
Schmidt’s hammer test is based on the principle of “rebound of a spring loaded mass depends on the hardness of the concrete mass on which the mass strikes”.
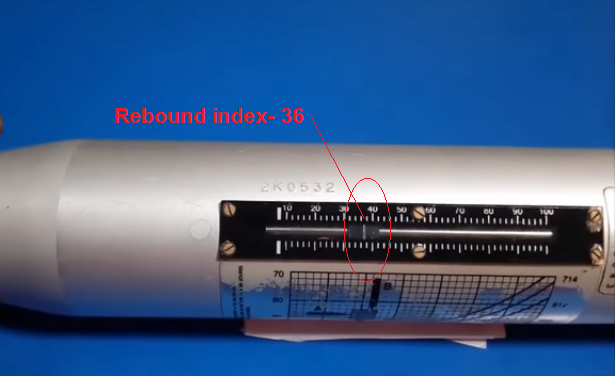
This rebound distance of the rebounded Plunger mass is noted down in the graduated scale as Rebound number / rebound index. The graph in the body of hammer is used to found out the respective compressive strength.
The concrete with low energy and low stiffness absorbs more energy from plunger and produces a low rebound value on the scale.
Objective of Hammer Rebound Test
- To assess the compressive strength of Concrete
- To compare the quality of two different concrete pour
- To assess the quality of concrete against the requirements of construction standards
- To detect the locations of weak concrete slabs or concrete with voids.
Apparatus Required:
Rebound Hammer Test lab report
Apparatus consists of a spring controlled mass that slides on a plunger within a tubular housing. The impact energy required for rebound hammers for different applications is given in table below

How to do Concrete Hammer Test Work:
Step 1 : Calibration
Carry out rebound test on a calibrated Anvil , supplied by the manufacturers. The anvil would be made of Steel with a hardness value of approximately 5000N/mm2. The rebound hammer should produce the reliable results on the anvil. if yes- procedure for inspection, if no- then send the instrument for re-calibration to the manufacturer .
Step 2 : Surface Preparation
The Test Surface should be smooth clean and dry. The loosely adhering scales should be grinded off using grinding wheel or stone. Rough surfaces resulting from incomplete compaction, loss of grout.
Spalled or tooled surfaces do not give reliable results and should be avoided.
The point of impacting the rebound hammer should be at least 20mm away from edges or corners of concrete.
Step 3 : Testing
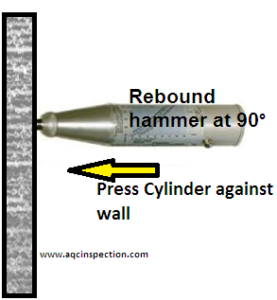
Hold the Rebound Hammer at right angles to the test surface with the plunger pin pointing towards the test location.°
Push the plunger against the concrete, and force the cylinder body towards the concrete. The force causes the latch to release and make an impact on the concrete. Essentially the rebound of the spring driven plunger mass is measured in the scale.
Repeat the Test for 6 readings, and average the value.
Rebound Hammer Test Procedure

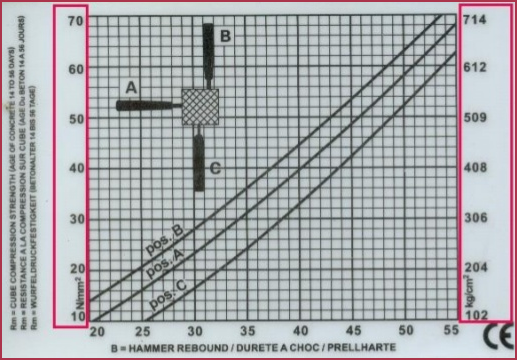
The measured value is Rebound Index which is checked in the graph for its corresponding Compression Strength in N/mm2 .
Rebound hammer graph
The Graph Contains Three different curves for three Different positions of Testing.
Pos. A – Horizontal Position,
Pos. B- Vertical down wards,
Pos. C – Vertical Upwards,

Step 4: Interpretation of Results
The result from the test tells us the quality of Concrete or rocks.

Standards for Rebound Test Hammer:
- BS EN 12504
- IS: 13311(2)-1992
Thus the nondestructive testing methods is a rapid testing methods which can be handled easily to determine the quality of civil works.
For more information and trainings for NDT, courses on NDT, we have our training institute open to all, visit us at


