Task: to measure the hardness on the shank and body areas of the drill.
Test piece: 3 mm drill bit.
Hypothesis and the preparation for the experiment: Considering the small weight of the piece the measurements were made with the TKM-459CE hardness tester and additional “H” probe with 1 kg load. It leaves an invisible imprint, which is crucial when there is such a small test piece.
Experiment features
1. The body
Taking into account the small size, complexity of the shape, and small flute, it was important not to damage the piece during testing. We used the vise to give the necessary mass and rubber strips to fill the flute.
Given the surface inclinations, we held the bit at an angle to the base of the vise to enable the vertical position of the measuring device to the tested surface (Pic. 1). The measurements were made on the cutting tip and land areas of the drill bit.
The same holding position was used during measurements of the shank part (Pic. 2).
2. The butt-end of the drill bit
The bit surrounded by the rubber strips was gripped with the vice butt-end up. The shank surface was polished in advance (Pic. 3).

The results
drill_scheme.jpgBecause of the complex geometry of the cutting tip, only 4 measurements could be made on the chosen surface area. During testing the recommended distances were kept: at least 1 mm (0,03 inches) between tested spots and at least 2 mm (0,07 inches) from the edge of the tested surface

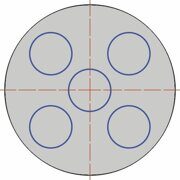
It is possible to take 5 measurements on the butt end of the drill. However, due to the very small space available, the prints were made at the distance bigger than 2 mm (0,07 inches) from the edge. That brings a risk of getting a high variance of the results (to the right you can see the map of the prints on the butt end).
After making several series of measurements, we came to the following conclusion: the TKM-459CE hardness tester gives a stable performance.
Our recommendations
It is necessary to:
- use the vise and rubber strips;
- make sure that the device is placed perpendicular to the tested surface;
- keep both the distances recommended between tested spots and from the edge of the piece.
In case you do not need to measure the hardness of the tip area, we would recommend using other areas to make more measurements and get more accurate results:
- If it is necessary to measure an entire lot of fully hardened drills, some samples can be picked, and their butt ends polished. In this way, the drills will be preserved intact for further use.
- In case there is induction hardening and the shank remains unaffected, then it is possible to сhoose a few samples and polish an area somewhere in the middle of the piece (preferably on the land surface).


