Introduction
This article is all about what happens to the effective angle of an ultrasonic beam when you scan around the outside of a pipe in the circumferential direction. It's super dull and contains math, but the big payoff is at the end when you get tables! Yay! You can skip there now if you want but you'll hurt my feelings.
The Backwall Keeps Moving!
Setting up to scan circumferentially to inspect a long seam weld can be a bit of a bear. Because of the curvature, the ID is continuously “dropping away” which increases the angle of reflection and can even cause the beam to completely miss the ID.
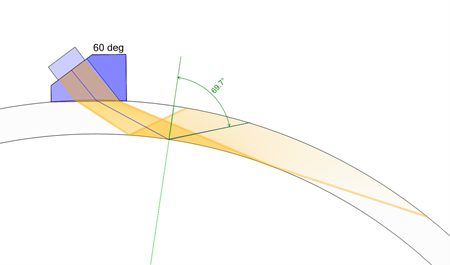
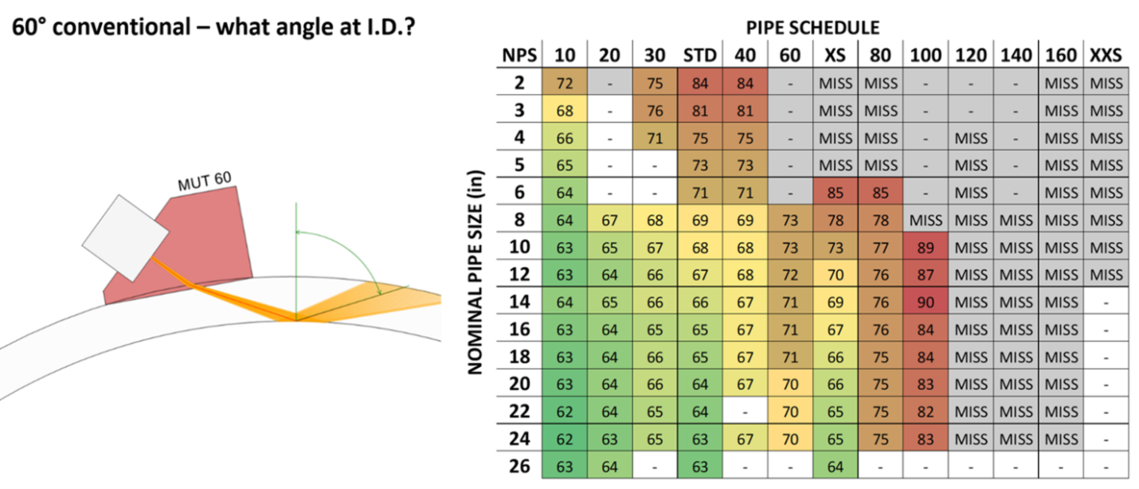
On a 12-inch Sch. 40 pipe, this 60° beam reflects off the ID at 70°:
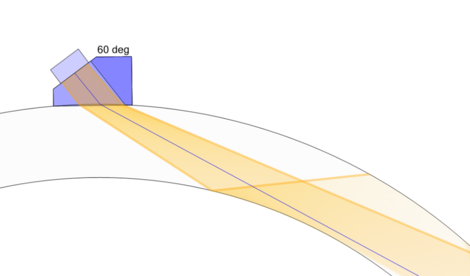
Whereas on a 12-inch Sch. 100 pipe, the 60° beam completely misses the ID:
This affects conventional UT as well as phased array, but the latter is a little more complicated. In PAUT, we're used to nice wide sectorial sweeps like 45° to 70°. But when scanning circumferentially we have to limit the upper angle so we can still bounce off the ID. Software like ES BeamTool from Eclipse Scientific is invaluable in developing and demonstrating an effective scan plan with PAUT or conventional UT.
Setting an Upper Limit
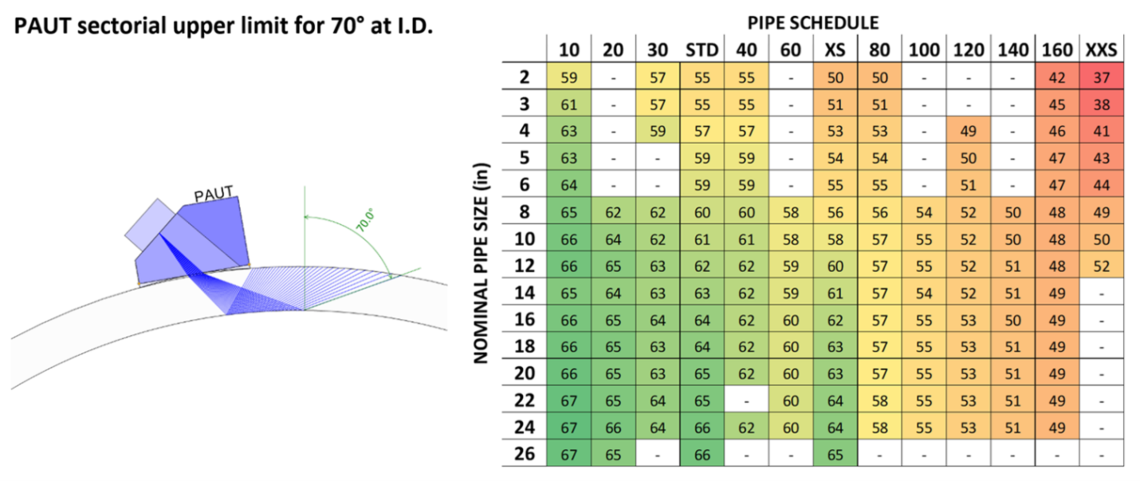
A good plan is to try and limit the reflected wave to 70°. Barely glancing off the backwall at a high angle might look like it’s going to work, but that little blue line on your scan plan is the center of the beam... and the top of it can still miss the ID. As well, shear waves reflecting at high angles start to mode convert into Rayleigh (surface) waves. You don’t get something for nothing. The more Rayleigh waves you make, the less shear waves you have left to make a bounce.
Trigonometry! Nerds Rejoice!
<math warning> skip to the end for a simple table </math warning>
Yes, finally a practical application for that triangle math you were supposed to learn in high school! I forgot it all and had to relearn it for this article! Exclamation mark!
Something called the law of sines allows us to find the angle of any triangle if we know one angle and the lengths of two sides:

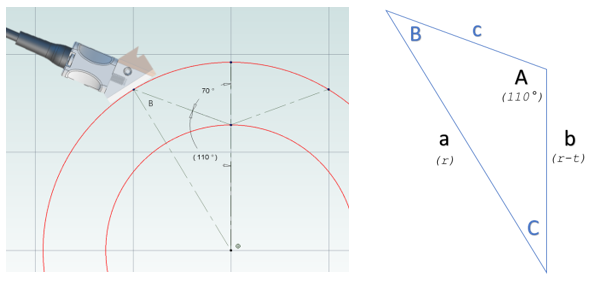
Using this, we can figure out the maximum refracted angle coming out of our probe that will result in a 70° reflection off a curved ID. All we need to do is plug the outside radius (r) and thickness (t) into the following solution and solve for angle B:
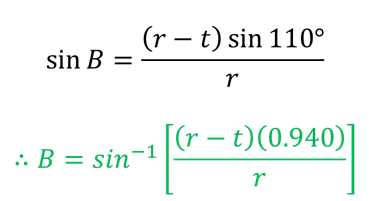
You can smash that into Excel yourself and hammer yourself out a table. The formula is this:
=DEGREES(ASIN((radius-thickness)*(0.94)/(radius)))
…or you can use the handy charts below.
All Charts, No Math
Below are pipe schedule charts that show angles instead of thicknesses. The first one is used with phased arrays when you want to find the upper limit on the sectorial sweep that will still result in a 70° bounce off the ID...
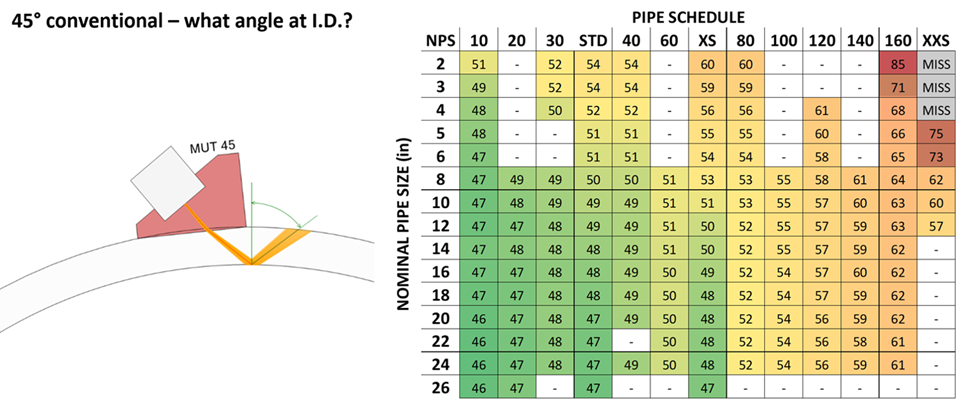
The next two can be used with conventional UT. If you have a 45° or 60° wedge, you might want to know what angle you'll end up with after you hit the ID...
The Second Last Section
For diameters larger than 20 inches, ASME lets you calibrate on a flat block. But for something like a 24-inch Sch. 80 pipe, a 58° beam turns into 70° by the time it hits the ID. And a 70° will completely miss the ID. So despite the fact the code permits calibrating flat in some instances, you might be better off using curved blocks anyways.
The calculations assume that the face of the wedge is tangent to the OD surface at the beam exit point. While the wedge manufacturer probably wants it this way, it may not always be the case. Wedge contouring that starts a few millimeters offset from the beam index point will skew the refracted angle one way or another.
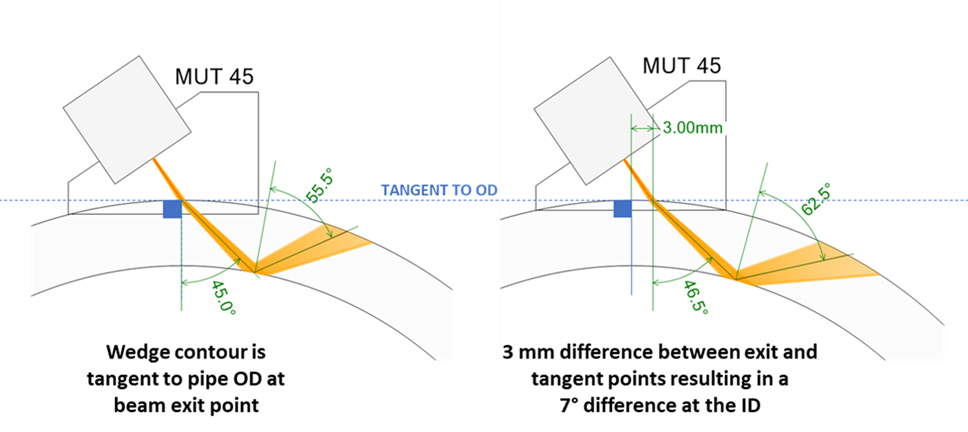
Also, PAUT index points differ depending on the angle: the theoretical center of a 70° beam has an exit point slightly closer to the front of the wedge than a 45°. Keep this in mind when performing beam plots. The plotting tool may tell you the angle at the ID is one thing, but the math may tell you it's a few degrees different.
Acknowledgements
Much like a lot of the stuff I write about UT, I again owe thanks to Ed Ginzel for constantly being willing and available to bounce ideas off of and steer me in the right direction (but not past 70°). And thanks to Jon Pearson for proof reading. If there are any leftover mistakes, I blame you Jon.
Source: https://sonatest.com/blog/ultrasonic-inspection-angles-curved-surfaces


